
In MEP design, some workflows require that you populate node identifiers for each connection point of a fitting throughout a pipework system across onto the pipes themselves, which in turn gives a pipe a starting node number and an end node number.

Working through this process manually is an arduous task. Selecting each pipe fitting and each pipe throughout the project and entering the data piece by piece. Let’s hope you don’t have anywhere to be this week, cause if you’re doing it the manual way.. you’re working late!
The thing is, we don’t need to manually enter this data any more. We can automate it using Dynamo.
Jumping in though and taking a stab at the solution you might hit a brick wall. The problem that we’re posed with is how do we know what element is connected to what other element through Dynamo? I can see that the pipework is interconnected in my view, but how does Dynamo know?
The simple wizardry behind it all is a two step process using bounding boxes. With bounding boxes around your modeled elements you can see which fittings and pipes interconnect by the intersecting bounding box, from there you can push and pull the data from fittings to pipes and vice versa.

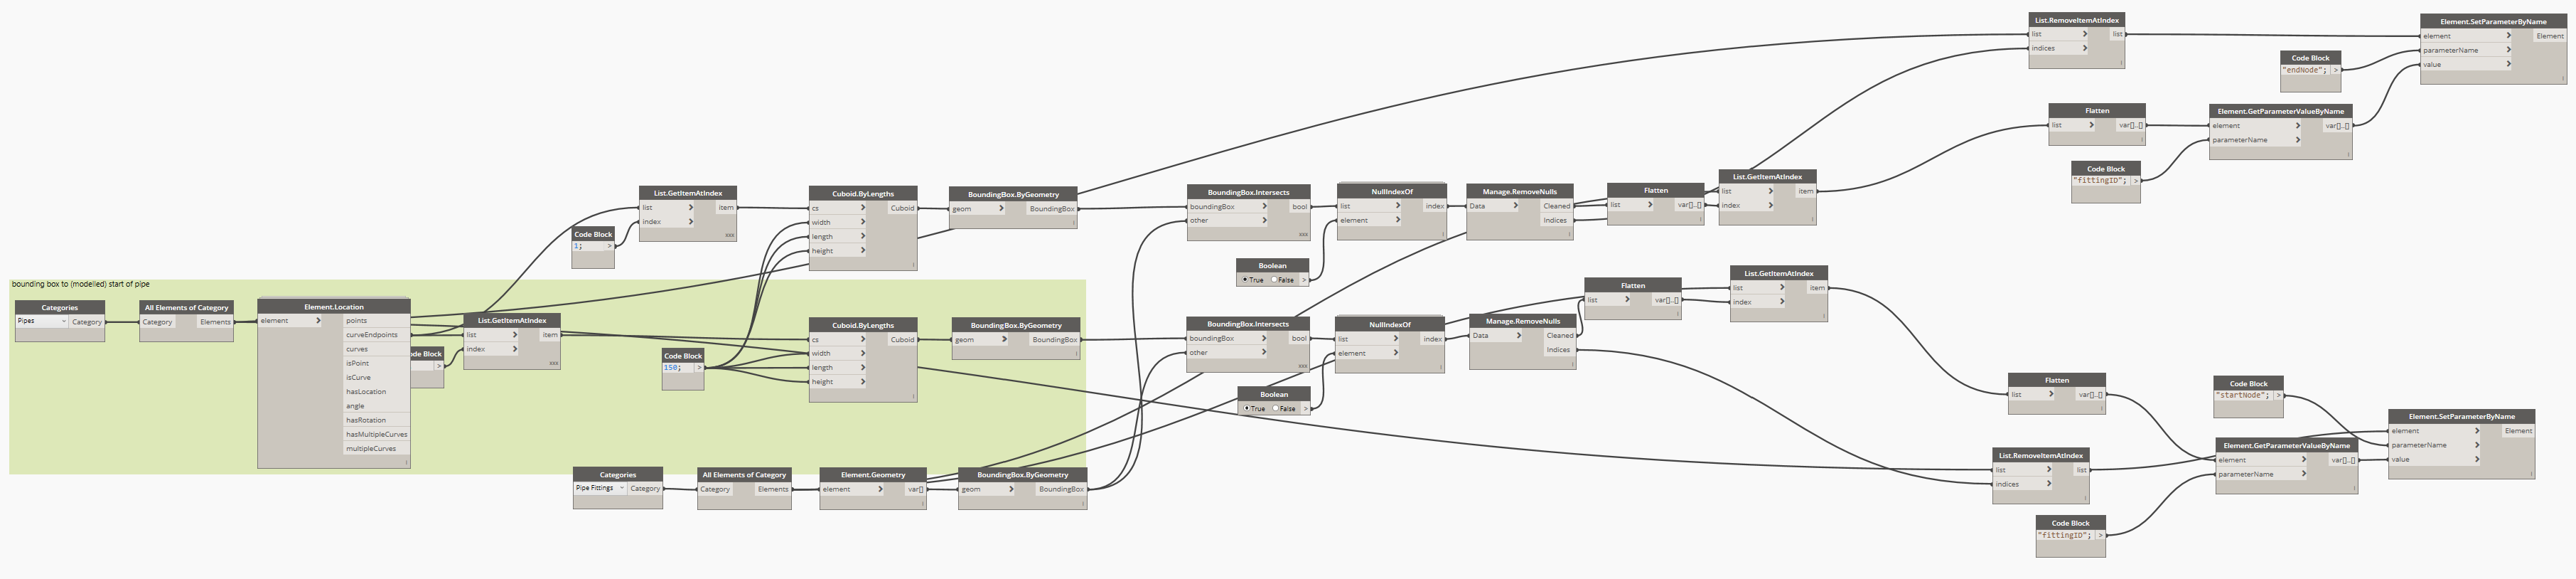
The first step is the creation of the bounding boxes. As you can see from the screenshot (click to see full screen) we’re taking the start and end points of the pipework and then we’re creating a 150mm square bounding box using the Cuboid.ByLengths node. To make life a little easier, we’ve used the Clockwork node Element.Location to get the endpoints of the pipes.
Keep a close eye on the nodes in the screenshot, for this to work properly you need a few of the nodes to be cross product. You can change a node to cross product by right clicking on the |, \, xxx icon. In the popup menu select Lacing -> Cross Product.

Because we are testing every piece of pipe against every pipe fitting, we need to remove the null results. In the example we’re testing 12 pipes against 12 fittings and when using cross product, this gives us a total of 144 results where only 24 of those results are meaningful, 12 from each list (start and end).

You can see in this snippet of the 144 results for pipe at index [0], it is intersecting with pipe fitting at index [0]. Although we can not see which fitting intersects with pipe at index [1], it does show that there is no order in which the results will come in.
As a result of this we need to make sure we are managing our lists correctly to ensure that we are pulling the correct information required to populate the information accurately.
We need to use some customs nodes from both the Spring Nodes and Lunchbox packages to help keep our lists in order.
NullIndexOf is based off the internal node IndexOf which will return the index of the elements in the list that in this case return true, and unlike the built in node it will return null instead of -1.
The next step was to use Manage.RemoveNulls node from the Lunchbox package to remove the nulls from our lists, as not every start/end point of the pipes will intersect with a fitting. eg the start of the pipe run in this example.

 So now we have a list for the start and a list for the end of the pipes and the corresponding index[] of the fitting that the pipe intersects. The second list is a list of pipe ends that don’t intersect with a fitting, which we take care of in a later step.
Now that we have removed the nulls from our list we can grab the required data to fill in our fittingId parameter. It is important to remember that we cannot feed in the list of fittings in the order in which we used to create the bounding boxes. To make sure our data will remain correct, we use the Cleaned list from Manage.RemoveNulls and feed that into a List.GetItemAtIndex. This will organise our fittings into the order required to populate the data correctly.
Now our fittings are in the correct order we’re ready to push node id data from the fittings to the pipes. We do this using Element.GetParameterValueByName node to get the fittingId, to then push it to the Element.SetParameterByName node to the corresponding startNode and endNode on the pipes.
Before we pass through our pipe list to be set with the fittingId we need to make sure that we remove the pipes that don’t have a startNode or endNode value. We can achieve this using List.RemoveItemAtIndex and the list of indices from Manage.RemoveNulls.

With the press of a button dynamo can make a process that you could spend days entering manual data into a task you can complete within seconds.
Great tutorial thanks for sharing. Would have been nice to have a complete map of the nodes as some overlap and are hard to follow. I have replicated and am getting a list of pipes out of the setparameterbyname node but even after having created the start & end node parameters for pipe in revit these aren’t populating with data. Perhaps I created them as wrong parameter type?
Did you have to create the fittingID parameter in revit as well or is this built in?
I appreciate this is an old post but would be good to know what is going wrong.
Hi David,
There are start and end parameters added to the pipework as well as fitting numbers on the fittings themselves. Here are the parameters that I used, these are all shared parameters, the decision to make them shared was purely because we wanted to tag the numbering.
and here is a screenshot of the complete graph. you might need to right click on it and select “view image in another tab” or something similar to be able to see the nodes properly as it is quite a large image (will depend on your browser)
Hello, Ryan. I am a civil engineer in Brazil. I’m learning a lot from your lessons. I could not find the Element.Location node of the clockwork package. I found one with the name Element.Location +, but this causes the error to enter the number one on the next node. Shows the following message on the node: “The index was out of range. It should be non-negative and smaller than the size of the collection.” The cross product is correct on all nodes. A list with the coordinates of the end of the pipe sections should appear, but there is 0,0,0,0. Thanks for your patience and help!
Hey Ricardo,
Sorry for the late reply. I’ve had a look at the graph and rebuilt it a 2nd time, everything appears to work fine. I’ve made the graph available as a download, which has been annotated for clarity. Hopefully it helps you out. Note that I have put this together in Dynamo 2.0.3, so it will not work in Dynamo 1.x
https://www.revit.com.au/downloads/dynamo-pipework-node-numbering