
A commonly asked question is can we have a 0A or P1 revision in our titleblocks in Revit. Most of the time, the answer is ‘No’
There is a solution however that can at least help us with the revision schedule in the titleblock, unfortunately the solution doesn’t work outside of the revision schedule itself.
The first solution below is to prefix revisions 1 – 9 with a 0, resulting in 01, 02, 03 etc.
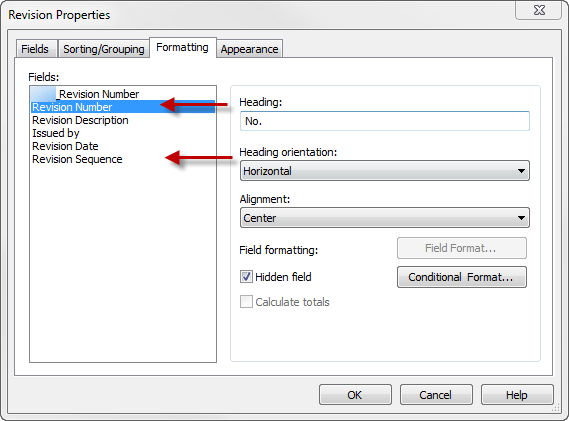
In your titleblock family, edit the revision schedule, add the parameter ‘Revision Sequence’ and create a calculated parameter named ‘_Revision Number’

The calculated value needs to include the following formula, or some variation of the formula
if(Revision Sequence = 1, “01”, if(Revision Sequence = 2, “02”, if(Revision Sequence = 3, “03”, if(Revision Sequence = 4, “04”, if(Revision Sequence = 5, “05”, if(Revision Sequence = 6, “06”, if(Revision Sequence = 7, “07”, if(Revision Sequence = 8, “08”, if(Revision Sequence = 9, “09”, ” “)))))))))

The calculated value needs to be a text value for this to work.
What the formula does is create a new revision number based on our newly created _Revision field. If the revision sequence is 1, then the value substituted (which will be shown in our title block) will be 01. You can do this for all sorts of variations such as P1, CD1, 0A and so forth.
Next, under the formatting tab, hide the fields ‘Revision Number’ and ‘Revision Sequence’ so that these values do not appear in our schedule.
Adjust the schedule to suit the revision columns in your title block. The next step is to add another schedule to achieve an automated revision number at the bottom right of the title sheet. To do this we need to create a second revision schedule.
Revit restricts you to only having one revision schedule in the titleblock family by default, however there is a work around to this. Open a second titleblock family, name the revision schedule something else and then copy and paste it into the titleblock you’re working on. You need to select the visual representation of the revision schedule in the sheet and use CTRL+C and CTRL+V to copy the schedule from one title block to another.


Now repeat the steps above to create the calculated ‘_Revision’ parameter within the second schedule. This time around there is an additional step, under the appearance tab, select ‘Build from bottom up’ and change the height to user defined so that you can limit the number of revisions shown to one. You need to adjust the height of the revision schedule visually in the sheet rather than in the revision properties dialogue box.

Place the second schedule aligned to the bottom corner of the titleblock as required to appear correctly. The revisions of the titleblock are now automated to whatever you like.
The problem with this solution though is that to work, it needs to be driven by the default ‘Revision Sequence’ parameter within Revit. Of course, this doesn’t directly relate to your revision. If you have a look at your revision dialogue box, the first column is the revision sequence. Revision sequence 3 could actually relate to Revision 03 on the project, but it could also relate to revision 02 on another sheet, or 01 on yet another. Therefore, even though we have a nice sequence of IF statements to generate revisions 01 – 09, by the time we actually get to revision 09, which might actually be at revision sequence 14.

The second solution will overcome this problem and is probably a little cleaner if say for example you wanted to place a P in front of all revisions for a preliminary series of issues, it could be anything from revision P1 through to P999.
Create another schedule within the titleblock, which I have named mine ‘Self Populating Schedule Prefix’ which sits alongside the main revision schedule so that it appears as a single ’01’ or ‘P1’ or whatever the revision might be. This would mean that you need 4 schedules in total within the titleblock family – remember you need to copy and paste them from another titleblock to have more than one.

I have then removed the ‘_revision’ calcualted value from the main schedule and replaced it with the regular revision number, which in this case will be 1, 2, 3 etc.
In the new ‘Self Populating Schedule Prefix’ schedule, I have recreated the ‘_revision’ calcualted value, this time with the following formula
if(Revision Sequence > 0, “P”, ” “)
Which simply creates a prefix of P if there are any revisions at all, if there are no revisions, then it will be blank.
When inserted into the project, the revisions will appear automatically with the P prefix, no need for dumb text to be inserted which eliminates error when you’re rushed to get documents out.


But what if you no longer wanted to prefix your revisions after a certain point? Easy. Say we moved to Tender at revision sequence 23, we would simply change the calculated value’s formula to
if(Revision Sequence < 24, “P”,” “)
Which would prefix all revisions with the letter P up until sequence 23. What if beyond sequence 23 we wanted to prefix our revisions with T as well? Again, a pretty simple formula
if(Revision Sequence < 24, “P”,if(Revision Sequence > 23, “T”, ” “))
Of course this will only make sense if you change from numerical revisions to alphabetic revisions when you move from preliminary to tender.
So clearly there are limitations, unfortunately not all work arounds are perfect, but if you can achieve what you want within these limitations, it is a huge help in eliminating human error when you’re rushed to issue documents.